Friday, January 14, 2011

new top hat

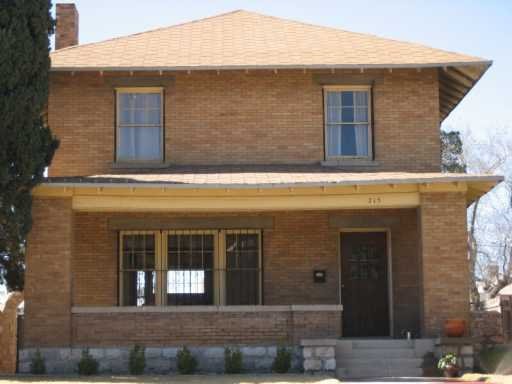
Let's all take a moment to admire my new roof..

Ah yes, that feels good. The flashing over the porch is kind of prominent, but doesn't bother me too much. I don't think we had any flashing with the old roof, so this is obviously superior. We also got some flashing on the chimney stacks which was also previously non-existent. A roof vent has also made an appearance -- hopefully we can cut those summer temperatures a bit. Didn't have any of that either. It's kind of hard to appreciate the color of this shingle. It's a little darker than the old shingle. Kind of light charcoal, with brown and green-blue highlights. I think it gives a much nicer contrast than the old roof. We're hoping to get the painters out soon to complete the look. More on that later..


Sunday, January 9, 2011

old roof shingles

Something kind of interesting about this roof is it still had the original wood shakes. From what I've seen around here it's still pretty common to see this as the first layer on your roof as opposed to plywood decking. Can you say "deferred maintenance"? Anywho, all this got ripped off and replaced with fresh plywood. Before it was all gone I was able to snap a few pics though. Kind of cool, but was in pretty bad shape. The house had three layers of shingle on the roof -- I could feel it just breathing easier without all that weight. Hopefully the house is happy.


Wednesday, January 5, 2011

my toupee!

The roofers have made quick work of the old roof. Two days of demolition and the installation of the new decking is almost complete. My house looks like a major construction zone at the moment, but it's going to be sooo worth it. Kudos to anyone who got my vague Letterman reference.. :)

Friday, December 31, 2010

sponge worthy

I've been saving some pieces of foam from old packages -- my idea to help stop the draftiness in my windows was to cut these to size and slip them in the groove between the sash meeting point and the parting bead. It's an impermanent solution as is, but it seems to work pretty well. I cut down the draftiness big time with just this little trick so I know I'm on the right track. If the Easy Stop doesn't work I'm thinking of doing a McGuyver and gluing these to the bead. I think they would be fairly durable. We'll see..


Thursday, December 30, 2010

window insulation

With old man winter beginning to wake up from his slumber, I've been thinking alot about insulation for my windows, particularly the upstairs bedrooms. Currently I'm working on restoring the two side windows in my daughter's room. Since I can't just squirrel these away for a few weeks and work on them full on, the progress is slow. I'm just about halfway done with both of these. What's different about these windows is I did these the "correct" way. That is, removing old glaze then pulling out the glass to clean it. Sand the rabbet (the groove the glass rests in), then reinstall on a bed of silicone. Prime it, glaze it, paint it. So yeah, it's a thing of patience. My window of opportunity is closing (pun intended) so need to finish these up for the season.

The whole point to fixing these windows aside from the whole restoration thing is to make them airtight. Drafty windows suck -- despite their beauty, my wood sashes need some tightening up. The glass on these two windows was barely hanging on. Honestly I don't know how they didn't just fall out with our spring winds. I fixed the glass firmly in place and added some expanding foam in the crevices to the rear of the sill, then caulked the windows. But the windows were still draftier than I expected. A big reason for this is the gap along the parting bead where the upper and lower sash meet. See below.

I estimate I can eliminate 50 to 60 percent of the problem by fixing that gap. But what to use? I've been reading up on This Old House on how to tighten up old windows and one thing I've come across is the Easy Stop system. I'm very interested in that it just doesn't have some silicone strip you put on the bottom and top sash, but a replacement parting bead with insulation built in. I will be investigating this further and have ordered me a sample kit to see if it'll work for me.

In the above picture you'll notice the edge of a metal strip the sash rides on. You may recall I've referred to this stuff as sash rail. I'm not sure if it is original to the house but it does seem to be an attempt at insulation. Of course the bottom part of the sash has a groove that's pretty tight, but the upper part where the sash cord rests in has a significantly wider channel. It's here where we have a problem with air penetration. I'm not sure the Easy Stop will totally fix this (seems like a big gap), but I'm hoping it will. In the meantime I have a temporary solution to help stop the chill this winter..


Friday, December 24, 2010

the attic

Up until a few months ago I'd never had the guts or inclination to venture up into my attic. It's not exactly easy to get into. The access hatch is in the guest bedroom closet and takes some contortion to lift from the ladder and into an angle with which you can pull yourself up & over. I wasn't really sure what to expect -- hidden treasure, a corpse? The possibilities were endless.

The air was thick with a very fine dust so I'm glad I strapped on the dust mask before my ascent. The reason why I went up there in the first place is we had a few big rainstorms in the fall and I noticed water dripping in from the ceiling in the guest bedroom. Didn't want to, but I knew I had to go check it out. A few things surprised me. One, there's insulation up there. I question it's R value, but I figure it's probably better than nothing. Looks like blown in cellulose. There had once been vines crawling up the exterior walls and I found evidence of them up there too. There must be quite a few breaches in the exterior armor that allowed this stuff to get in there. The old duct work from the evaporative AC unit was still intact save for quite a bit of rust on the piece connecting to the outside.

Check out all that water damage. When the HVAC guys installed the new system and removed the old one from the roof they didn't do a good patch job. The claims adjuster also found extensive hail damage from early this year. Luckily my insurance is going to cover the cost for a new roof. I'm super excited. That's one major project we'll be able to scratch off the list several years earlier than we were hoping for. This rocks. More updates in a few weeks...


Tuesday, December 14, 2010

pic of the day

franklin mountains state park