Tuesday, December 29, 2009

chimney gunk

Take a good hard look at that picture. A couple weeks ago we started having problems with our furnace shutting off constantly and never really heating properly. After much frustration with the HVAC guys, they finally figured out there was an obstruction on our furnace exhaust pipe. This leads to the utility chimney stack shared with the water heater. Needless to say, it's been (many?) years since this has been cleaned out. It doesn't help that the chimney is unlined -- the pipes only entend a few feet up the stack. Aside from the obvious fire danger, this is also a carbon monoxide danger. It needed to get fixed ASAP.

I called a company that specializes in chimneys to come out and take a look. They gave it a good cleaning and I'm so happy that everything is finally back to normal. Furnace is heating as it should, yay!! In the next few weeks we're going to schedule them to come out again and line the chimney with a flue for both pipes and cap it off. Also considering getting it repointed while I'm at it. Let this be a warning to never assume all your exhaust vents are peachy clean. I know I won't..

Friday, December 11, 2009

McBroom history

I happened to be in the downtown library the other day and did a little research. Still trying to find the specifics of the house like builder/architect, etc. Unfortunately if your house wasn't built by someone prominent (like Henry C. Trost) then you probably aren't going to find anything. Well at least not in the library. I plan to hit the Special Collections at the university sometime in the future. Little by little a picture is forming from the clues though. I uncovered some very interesting info about Joseph H. McBroom, the original owner of this house. As soon as I can get my hands on a scanner, I'll upload images of these articles. In the meantime you'll just have to take my word for it.

El Paso Herald - Oct 10, 1902

FOUR NEW LAYERS FOR THE EL PASO BAR
Joseph H. McBroom, from Indiana, is the latest addition to the legal fraternity. Yesterday he was admitted to practice in the courts of Texas by Judge Walthall. Mr. McBroom presented credentials from Indiana and the motion for his admission was made by Adolph Heffman. This is the fourth man admitted to the local bar this week.

So now I finally learn a bit of the back story on McBroom. He was in town for a quite a while before he had this house built. I'd love to know where he lived prior to 1914, if it still exists. Many non-hispanic residents of this period were transplants from the midwest of german or irish descent. I had a feeling he might have moved here from the midwest.

El Paso Herald - Oct 22, 1915

CITY ATTORNEY WARE RESIGNS; J.H. McBROOM IS APPOINTED
City attorney W.B. Ware has resigned his position, effective November 1 and will be succeeded by attorney J.H. McBroom. The resignation was given to the city council at 5 o'clock Thursday evening and was acted upon by the mayor and his councilmen, who selected Mr. McBroom to take attorney Ware's place.
The report that the city attorney would resign has been current for several weeks, as Mr. Ware has stated that his law practice demanded more of his time than he contemplated and that he could not give the city affairs enough time.

The plot thickens. So it appears Mr. McBroom got a promotion round the time this house was built. He had a few weeks lead time, but from my research this house was built in 1914. Maybe he was expecting it before his boss actually gave word. I'm not sure if city attorney means the district attorney. I suppose he could have served in a more general capacity for all legal matters of the city.

El Paso Times - Jan 9, 1956

J. McBroom, Former City Attorney, Dies
Funeral arrangements for Joseph Howard McBroom, 84, who died Sunday in his home, xxxx Elm St, were pending with Harding and Orr Funeral Home.
A resident of El Paso since 1902, McBroom was a retired lawyer and former El Paso city attorney. Having served from 1915 to 1919 and again in 1931.
From 1923 to 1929 he served on the El Paso School Board and at one time was its president. He was a law partner of Walter H Scott and later was associated with Attorney Frank Clayton.
Mr. McBroom was a member of the El Paso Bar Association, First Presbyterian Church, and Kappa Sigma Fraternity.
Born in Monticello, Ill. on Jan. 30, 1871, he was graduated from Wabash College in Crawfordsville, Ill., in 1897. In 1898 he was admitted to the Indiana Bar.
On Sept. 15, 1954, he and Mrs. McBroom observed their 50th wedding anniversary.
Survivors, in addition to his widow, include a daughter, Mrs. R.P. Langford; two grandchildren, Joseph H. Langford and James M. Langford, all of El Paso; and a sister, Mrs. Emma Humphrey of Illinois.

Whoa, its the biggest helping of house history I've yet uncovered. Where to begin? After starting his career, Mr. McBroom didn't stay in the midwest very long before relocating to El Paso. He seemed to be very involved in his community and a devout family man. I have seen the city directory from 1927 with him still listed at this address. So I'm unsure when he moved to the house on Elm St. The street sounds familiar, I do know it's somewhere in the central area. I'd be very interested to know if his descendants still reside in El Paso. I would love to see some old photos of the house and any other information they would like to share.

Thursday, October 29, 2009

Wednesday, October 28, 2009

window restoration pt8

As if you didn't know what the last step was -- two coats of exterior latex paint. Luckily I was able to get 'er done before some bad weather rolled in. There is a bit of minor touch up required before I will fully move on from this set of windows. I need to scrape a bit of the glaze residue and occasional paint drip off the glass. With a razor blade this isn't too big a deal. As you might have noticed I like to tape off the glass while I'm painting. Which works great although I sometimes have a piece of latex ripped off when peeling it off. So a little touch up is in order.

It's been about two years since I originally mused about fixing these windows -- holy cow I hadn't realized it's been that long. In my defense, I took a year hiatus as I concentrated on being a parent. Then the backyard landscaping consumed my spare time for the next six months. It wasn't until sometime this summer that I refocused attention to my dining room windows. I'm so glad to say they're "done". I have other windows in progress so hopefully I'll be able to keep up the momentum. But first I need to get the guest room fired up again. Does it ever end?

Today I'm not going to worry about that though -- commence snoopy happy dance!

Tuesday, October 20, 2009

chi to chuco

Sorry for the lack of posts -- I plan to complete the window restoration series this week. I just got back from some vacation time in chicago. It never ceases to amaze me the ridiculous amount of cool old architecture there. I mean seriously. I like to think el paso has the old heart of a small midwestern town. Modest, but we got some cool stuff here. Hopefully when I finish this house that will be one more notch towards the ongoing dream to revitalize the old core of this town.

Okay, back to work.

Friday, October 2, 2009

window restoration pt7

You guessed it -- time for a coat of primer. I choose to use a good exterior oil based primer, going with sherwin willams. You may remember a while back me listing a few good links for exterior painting. I remember way back being utterly confused with the whole oil/latex thing. This is what I finally settled on and have been pretty happy with the results.

Wednesday, September 30, 2009

sash rail?

For lack of a better term I'm calling the aluminum trim on the side of the window casing, sash rail. One of the windows in the guest bedroom is missing one on the lower sash. With a little wind the sash has an annoying habit of slapping back and forth without the rail in place. I really need to get the missing one replaced, problem is I don't know where to find one. I made a pass through lowes and didn't find anything similar, not that I was surprised. I might be able to find something at one of the old school hardware stores, not sure. Anyone know where I could find something like this online?

Wednesday, September 23, 2009

window restoration pt6

Next step is a little weatherstripping. I've used acrylic/silicone blends before and have been disapointed when they eventually crack. This is especially prone to happen here with the wild fluctuations we can have in climate. Most of the year is bone dry with very little humidity if any, then the monsoon season comes around. Before you know it doors and windows don't work very well for a month or two. So I decided to not cheap out and bought a tube of 100% silicone caulk/sealer. I'm concentrating on the edge where the wood framing meets the brick. Apply and smooth it out with your finger. Simple. We're getting close baby..

UPDATE: From experience, it can be a pain to work with silicone caulk before painting, the paint doesn't adhere well if you're a little sloppy. I've actually gone back to using a paintable caulk for this step (like AlexPlus) just cause I'm a little messy. If you do use silicone, it might be better to do this after step8.

Friday, September 18, 2009

berm be gone

Leveling out this patch of dirt brought back bad memories of the big dig, but otherwise not too bad. You may remember my leaky basement (which was the whole point of doing this) -- don't think I would have ever bothered otherwise. I'm glad the hard part is finally over. Now I can start making it purty again. First thing is to pick up a load of flagstone. Trust me, it's going to look sweet. :)

Wednesday, September 16, 2009

pic of the day

Bassett tower, ca. 1930

Wednesday, September 2, 2009

stripping paint

I'm pushing forward with the guest room restoration. As you might remember, there are multiple things to do in here, but step one will be restoring the window sashes and installing new casing. I have the lumber sitting off to the side, but need to get all the paint of these first. There's some nice pine under that paint, which luckily had only one coat of latex. At first I tried heatgunning it off but that was akin to killing a roach with a sledgehammer. Way too easy to singe the wood. I opted for the more gentle method of using a chemical stripper. I've used citristrip in the past and wasn't very happy with it -- very messy to use. I really like PeelAway and gave each of my windows a coat each. As you can see I still have some more to clean up. So my question is, is there an easier way to strip latex paint? I think one more application should do the trick, so I'll probably just do that. I also want to pull them down and fix the glazing before getting my guy to trim them out. I know I'm going to be tempted to scrape/sand/paint the trim on the exterior while I'm at it. I wish there was more time in the day..

Friday, August 28, 2009

window restoration pt5

I've been looking for these little bad boys for a few weeks. The good thing about a monster store like home depot is they have a lot of stuff. The bad thing about home depot is they have a lot of stuff. For the life of me I couldn't find anything like this in either of the big boys. I did find something similar at the ace hardware just north of town, but they weren't the right ones. These are the ones I'm looking for -- I finally found them here. Unfortunately they don't come in single packs and so had to settle for a 10 pack. I should be set for life I think..

As you'll imagine the next step in my window restoration is getting the glazing on the windows. It was really only necessary in spots. The longest of which was on the lower sash of the large middle window. There weren't any glaziers points holding the glass in so I really needed something in there to help stabilize it. I put one in every 6 - 8 inches or so. Once I took care of that it was time to get some window glazing on. Luckily you still can find this stuff at the big boxes. I'm using DAP, but not really aware of anything else out there. Get a handful and roll it up like you're kneading dough. I don't like to get too much at a time as it's a little harder to handle. Get it into thin cigar size strips and finesse it onto the glass and wood as best you can.

Then come back and cut the glaze down to size. You should come in about 45 degree angle and should aim for as tight a corner as you can. You shouldn't see the glaze dead on from the inside so that should give you an idea of how much to cut down. With a wide open path of no glaze it's pretty easy to do this technique, however if you're patching in new glaze to blend in with old you may find that a little hard. What I like to do is cut the part that's protruding out towards you first then do small cuts one by one with the edge of the blade dead on towards the glass. That probably makes no sense, but if you run into the same problem I did you'll know what I mean. Once you cut the excess I like to smooth out the surface of the glaze with my finger so there are minimal bumps.


Wednesday, August 19, 2009

First National Bank

Every once in a while it's fun to see the way things used to be back in the day and compare them to what's there now. Today's pick is the First National Bank. I don't know the exact year it was built, but going by other landmarks I'd guess sometime between 1905 and 1915. As is typical for early 20th century architecture downtown it has a heavy classical emphasis (Beaux arts? Maybe renaissance revival? Not sure the difference). It was full of intricate medallions and beefy corbels holdng up a distinguished cornice.


This is what it looks like today. It's been remuddled to hell and back. While this renovation aberration occurred most likely in the 60s or 70s, there is one last bit of character left that whispers to the grand detail that once personified this building. Appropriately enough it is the rear of the building, viewed from the alley.


Tuesday, August 18, 2009

guest room restoration

When we first bought this place, the majority of the house was livable and mostly renovated. Eventually we'd like to completely redo the kitchen and bath, but otherwise it wasn't too bad. Aside from the windows, it's been mostly cosmetic. The guest room on the other hand had the distinction of worst room in the house, except for maybe the basement. Not exactly a good thing for the "guest room". There are multiple things wrong with this room. Of all the floors in the house, this one has ugly knotty pine patches. The walls have a thick ugly texture on them and most of the original wood trim is gone. Luckily the wood sashes are still there as is all the trim in the closet. It shouldn't be too hard to fix this room.

We're starting with the wood trim, specifically the window casing. For a while I've had my suspicion this room was never painted. Across the hall in the master bedroom, I've always found it odd that the rest of the upstairs was painted yet it was still a nicely stained finish. It's been touched up, but it is original. The layout of the rooms is the same too. It has the same bench seat in the closet with some hefty built ins. Pretty nice actually. You may remember the nursery incident where I sucked it up and just painted what had originally been painted. At least here I have a reason to strip the wood.. I needed to know once and for all -- gotta get started stripping the wood around these sashes before I get the new casing put up. It's some stained grade pine I bought locally which I'm always happy to do.

Here's a closeup of the cheesy molding someone put up. This is going to get replaced soon. I'm shooting for october as we'll be expecting guests again round that time.

Check out the goods. This is going to look so awesome. What's interesting is everything was originally stained except for the closet. Note the two tone finish on the inside of the closet door. This is both good and bad. The good being it's far less work. The bad is that it would have looked pretty cool if it were all stained, including the closet. The master closet is stained although I don't know if it was originally that way. I will be putting it back the way it originally was. There are too many other things that I'm focusing attention on (like finishing my windows for the season) to stress about whether a closet should be stained or not.


Monday, August 3, 2009

window restoration pt4

Slowly it's starting to come together -- you want to let the wood hardener cure for a week or two before moving on to the next step. All those rot holes, gouges, and cracks can finally be filled in with some epoxy. I again call on the lords of restoration from Abatron, my tool of choice is WoodEpox. Again you mix an equal amount of the A and B parts and you're ready for action. You have about 30 - 60 minutes to get it on before it hardens, so work quick. The consistency is kind of like playdough but I find this stuff a little harder to work with than the LiquidWood. Maybe it's because I can't quite manage it with a scraper or I feel like I'm all thumbs when working with my hands (with gloves on). Once it's on, you'll want to let it cure for a week or two before sanding.


Friday, July 24, 2009

decrepit building of the week


I've had my eye on these four buildings for a while, which I suppose is odd because they're easy to miss. With exception to the third one down, they look fairly unremarkable. One thing I go back and forth with is how buildings here for some reason or another have been radically altered for no particularly good reason. You see this most often in downtown -- alot of businesses only have any real income potential from the bottom floor and so property owners have taken heart to completely forgetting the rest of the building to the point of bricking/concreting/removing all detail on the upper floors. I've never understood this but it is what it is.. These commercial buildings are actually victorian. Two italiante, a romanesque, and a queen anne to be exact. Look a little closer.

This one right here I'm particularly interested in. Mostly because it still retains the majority of its detail with exception to the bricked in windows and paint scheme. It has a high style victorian look that I just adore. I have dreams of buying this building and doing a complete restoration. I'd live in the top floor of course..


The corner building is the queen anne. Don't see it? Note the steel girders running along the clipped edge. That was the previous home of a turret my friends. The windows have been possibly shortened and the entire building is covered in concrete (stucco?), further obscuring the original detail underneath. This would be an awesome project, but I wouldn't want to think what it would cost to restore this one properly. The turret alone would be ridiculously expensive to recreate.


Here's an old picture I found from the public library archives (aultman collection). If you look lower right you'll see the buildings in question. Well you mostly see the corner turret building, but you get the idea. How times have changed.

Thursday, July 23, 2009

window restoration pt3


Ok, now we're finally getting somewhere. The next step in my window restoration is to apply some wood hardener. In this case my tool of choice is LiquidWood by Abatron. This stuff isn't too hard to work with, just mix an equal amount of both the A and B parts and you're good to go. You have about 30 - 60 min to get the stuff brushed on so only mix what you need. You probably wouldn't want to waste anyway as it's pretty pricey. However it works like a dream so it's worth every penny. At least until I have to buy another batch and I'll moan over how freakin expensive the stuff is.. The consistency is kind of like syrup and dries to a glossy sheen. Try to put it on when it's a bit overcast or try to work when the wood is in shadow -- with the heat of the sun this stuff actually gets hot (which means it's starting to harden quicker). Don't be shy and get it in all those nooks and crannies.


Wednesday, July 15, 2009

window restoration pt2

The next step is to apply some kind of fungicidal treatment to the exposed wood. This is probably an optional step, my windows have a lot of splitting and soft punky rot. It's a good move to stop this process from going on undetected behind fresh paint. That said, it couldn't hurt and will probably make your paint job go that much further before some maintenance down the road. I like to use Wolman's Woodlife Classic -- it's designed to protect against rot and decay and repels water. It has a milky consistency, but dries to a clear sheen. My windows just soak this stuff up. Be sure to apply liberally.

Tuesday, July 14, 2009

window restoration pt1

There are many resources online that highlight what is involved in restoring original wood window sashes. I won't do anything groundbreaking here, rather this is more of a timeline of what's involved to restore a window properly. I say that knowing full well that this isn't a truly accurate restoration. I'm not planning on having the downstairs windows operable and so they will be painted shut. I plan to go all out for my upstairs windows though. The process will be much more thorough as each sash will have to be removed and fixed one by one.

Step one in the process is scraping and sanding down the wood (duh). Depending on how hardcore you want to be these could go all the way to bare wood or just a light scraping. I choose to be middle of the road here. These three windows took about 10 - 15 hours of work. If I can't get the old paint off by careful scraping and sanding, then the paint is still in decent enough condition to stay on for a fresh coat. Get off any old glazing around the glass if needed and expose any gouges down to bare wood if at all possible. This should get them ready for the next phase: dry rot treatment.


Saturday, July 11, 2009

old sunset heights


I was browsing the Hall House blog and saw some cool photos of the author's street from 100 some years ago. That gave me an idea to put up an old photo too -- this one is from pretty far away though. This would be looking down from the top of the hill towards juarez, mx (hills and mountains in the background). The photo was probably taken shortly after 1909. In the distance lower right you can see the elementary school (big tan brick building) which is directly across the street from me. The big red brick victorian house two houses down from me is there too, and looking left an empty lot (which now sits a 1940s adobe style house) then mine (which is also empty lot). You should be able to see just the edge of it, which leads me to believe this photo was taken between 1909 (when the school was built) and 1914 (when my house was built).

Much of the neighborhood in its current form doesn't even exist yet. Mostly you see victorian homes in this pic. They tend to have been concentrated on the lower sides of the hill (both east and west) and are of a more modest cottage style. That's what's interesting about this neighborhood is that it was platted late 1880s (I think), but you don't really see too many homes pre-1890s. They tend to be mostly concentrated near downtown then as you go further north they thin out somewhat about halfway through the neighborhood (about where my house is). You start to see more of the classical revival, bungalow, and foursquare construction on the north end of sunset heights. The highest part of the hill is where the more affluent lived. The mansions constructed there are a decade or two younger. I guess it was fashionable in the 1890s for the well to do to still be "in town" as this neighborhood was considered off in the boonies.

Thursday, July 9, 2009

leaky basement

Anyone out there have a leaky basement? I do. But it wasn't always like that. Remember a few months ago when I was basking in the glory of my newly completed landscaping project? You may remember I mulched the area adjacent to the house which seemed like a good idea. Unfortunately I decided to create a little hill or berm (I think that's what they're called). The idea was to get rid of some excess dirt from my excavation and create a little focal point for that area of the yard. Come monsoon season what I got was the perfect storm.

The slope of the berm going towards the house combined with landscaping plastic underneath brought the water unabated into the basement window. My little brick barrier is completely inadequate for keeping any water out -- I'm going to have to put something in solid concrete in its place eventually. In my defense we did create a channel running along the foundation so as to pull any water away from the window. That didn't work too well though. Well maybe it did, but it's still not good enough. In the meantime I'm going to have to level out the berm. :(

Over the years water has slowly been messing up the interior finish on my basement wall. That's a future project. So what's the lesson here kids? Water should always drain away from your house, not towards it.


Friday, June 26, 2009

expanding the district

Wow it's been a while hasn't it? I guess I wasn't kidding when I said I would take some time off. Don't worry, I'm still working on my windows. I know everyone is just exploding in anticipation. Patience my dears. I got some vacation time coming and am planning to get those pesky dining room windows finished already. On to other business.

I'm somewhat active in my neighborhood association -- for the past few weeks I've been documenting two streets outside the recognized historic district boundaries. My hope is to get these incorporated into the district so as to give them some level of protection and save what is left of these residential streets. First I need to research the history behind the 40 - 50 historic homes I've identified. But how do you define "historic"? I say anything pre-war (WWII). Sunset Heights was supposedly platted sometime in the late 1800s, so I'm looking for anything built in that timeframe.

The years have not been kind on the the eastern fringe of this neighborhood. Most of the grand mansions that used to stand here have long since been torn down. The ones that are left are more than likely living on borrowed time. Sandwiched between a medical district and downtown, one of these residential streets has been turned into nothing more than a highway. Sad to see really. The homes and apartment buildings that are left have a narrow strip of sidewalk to contend with while having cars fly by you at 50 mph. But I digress.

Here's a sampling of what I'm talking about. Some are in pretty good shape, others are falling apart, and some are completely unrecognizable (historically speaking). I want to document them all and hopefully give them a new lease on life. Cross your fingers.

You don't see very many vintage rowhouses in the western U.S. I'd go so far as to say they are virtually non-existent in the southwest. This is one of the few examples I've see here in el paso. These ain't no Brooklyn brownstones, but I still think they're pretty cool. Definitely worthy of inclusion in my opinion.

This is my favorite queen anne in the neighborhood hands down. The Mundy house is far larger, but there's something about this one. Maybe the tight, more urban footprint of the lot. I imagine there was a row of similar houses off to the right. In their place is a nondescript warehouse type building. What a sight that must have been.

This is one of the big mansions that still stand on the further of the two streets. This one is obviously well cared for and loved. Currently a lawyer's office I think. The picture doesn't do it justice really. There is a small cluster of homes adjacent to it, the rest are parking lots.

This beaux arts style apartment building (maybe that's an overstatement) is pretty neat. Still in active use, so that's always good. I don't really know too much about it, but would love to see inside.
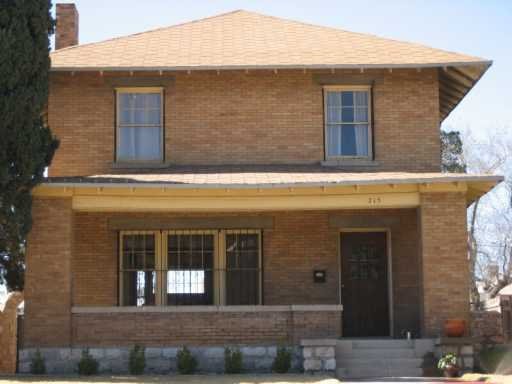
This is another of the big mansions still standing on this street. I'm not sure what architectural style you'd call it. It has some elements of classicism. Still very impressive and well cared for.
Sadly I don't know how much longer this apartment building will be around. It has suffered from complete and utter neglect after being condemned -- which has been a while as far as I can remember. During that time, its decay has accelerated. I would have liked to have seen it in happier times.

Wednesday, April 22, 2009

pic of the day

apt building in san francisco hist district

Saturday, April 4, 2009

exterior painting articles

I put together some articles that helped me form my own opinions and assumptions about how to deal with exterior paint. Hope it helps.

Friday, April 3, 2009

revenge of the dining room windows

Wow has it really taken me this long to get back to work on these? I've had a few days off and figured my windows aren't going to fix themselves, so I got back to work. The windows are in worse shape than they initially appeared. Whoever painted these last decided to forgo the proper repair. The old paint was scraped down, but the wood was is in pretty beat up shape. There was no oil based primer put down either, which probably didn't help. Allright people -- if you're going to repaint your original windows don't forget to put some oil based primer down BEFORE putting on the latex paint. Rant over.

This was made more difficult than it had to be since now I have to scrape off as much of the latex that I can to get down to bare wood. The wood is pretty soft and punky in spots with some serious gouges and rot holes. I'm going to have to break out my de-rot stuff and fill with plenty of epoxy to take care of this thing.


Wednesday, April 1, 2009

backyard before & after

I was browsing through my old appraisal from when we bought the house 3 years ago and I was shocked how much it looked like crap back here. I didn't think we'd done much, but wow that's a big difference. I think we were so blinded by the cool old house thing we didn't notice just how ugly it used to look. Hopefully in another year it'll look even nicer once we finish the last few things we want to fix on the exterior.

Many thanks to the landscaping crew from Super Handy Men -- I'm very pleased with their work.

BEFORE:


AFTER:

Sunday, March 29, 2009

backyard landscaping complete

I'll let the pictures speak for themselves, but I think it looks awesome if I do say so myself. Now I can actually enjoy my backyard without looking at it in disgust and frustration. Check it out here.

Wednesday, March 25, 2009

sod baby, yeah!

It's amazing what a blanket of the green stuff can do for your yard. Especially when you've gotten used to all brown, all the time. Wow. Sorry, no pics yet. You'll have to wait for the big reveal. :)

Friday, March 20, 2009

tour of homes 2009

The Sunset Heights Neighborhood Improvement Association is hosting the annual Tour of Homes on saturday 3/21. If you're in the area, stop on by and check out some cool old houses. Admission is $15 purchased at any of the homes on the tour, from 12pm to 4pm. All homes on the tour will be serviced by a free trolley and we're hoping to have some folks in period costume from a local group. Below is a sampling of the homes on the tour.


victorian apartment building, ca. 1903

Burges home, ca. 1912

Trost home, ca. 1908

Sunset grocery, ca. 1913